Building an NFT subgraph to index off-chain data using File Data Sources
A Practical Approach to Subgraph Development with File Data Sources for Seamless Off-Chain Data Indexing

🛠️ Building @oneforallweb3 | prev DevRel @0xmetaschool | Top Community Contributor @_buildspace @LearnWeb3DAO | Advocate @GraphAdvocates | Open Source Web3 Dev
gm gm everyone!
Today we will be learning how to implement File Data Sources into your project and get IPFS metadata into your subgraph.
File Data Sources
First, let us look at what precisely File Data Sources are.
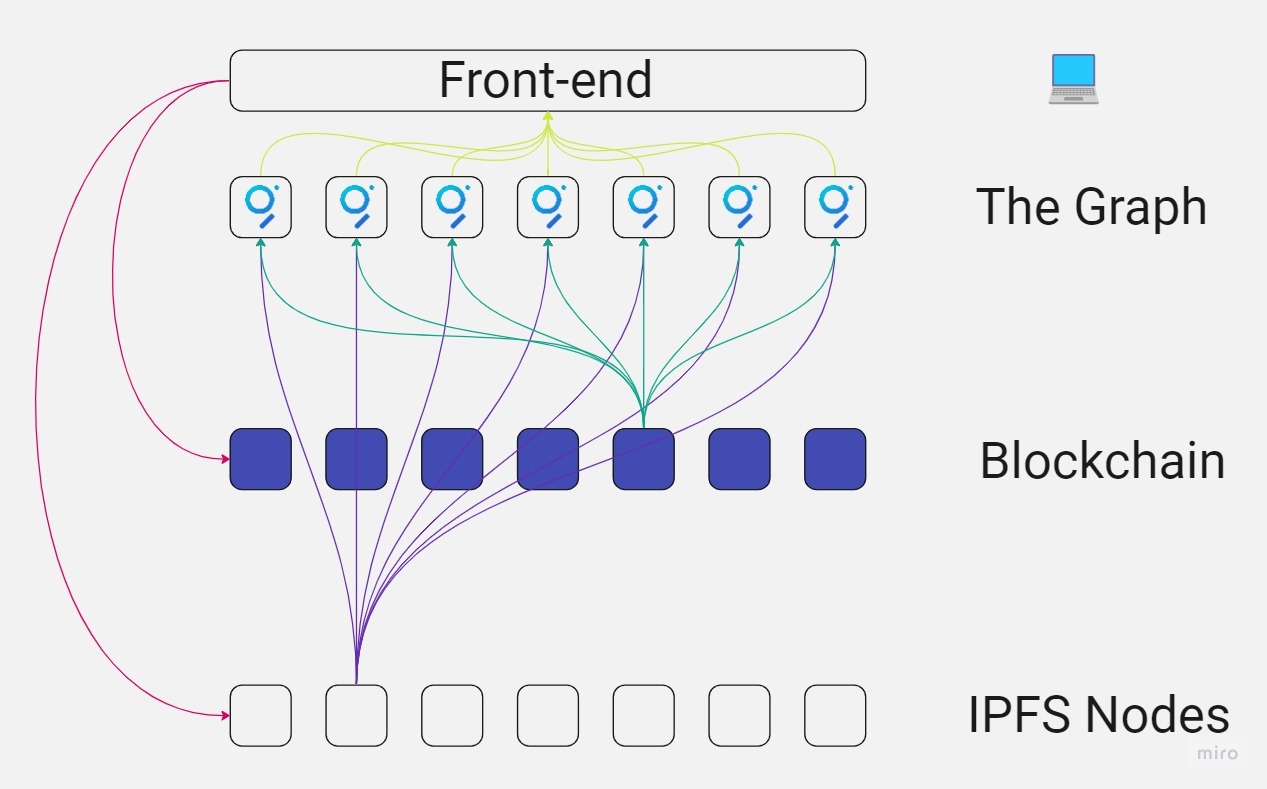
The Graph Network has introduced an exciting new feature for subgraphs - File Data Sources. This functionality allows developers to access off-chain data during the indexing process in a robust and extendable way. File Data Sources support fetching files from IPFS and Arweave, opening up possibilities for deterministic indexing of off-chain data and even the potential introduction of arbitrary HTTP-sourced data.
We'll dive into what File Data Sources are, their benefits, and how you can implement them into your projects to get IPFS metadata into your subgraph. While the example focuses on an NFT use case, the principles apply broadly to various applications.
Overview
File Data Sources work by introducing templates that can be spawned as new data sources for specific file identifiers. These data sources are responsible for fetching files and running dedicated handlers when the file is found.
Key Steps and Upgrades
Before diving into File Data Sources, there are some key steps and upgrades to be aware of:
Upgrade graph-ts and graph-cli: To use File Data Sources, you need graph-ts >= 0.29.0 and graph-cli >= 0.33.1.
Entity Types: You need to add a new entity type that will be updated when files are found. File Data Sources cannot access or update chain-based entities but must update file-specific entities.
How File Data Sources Work
File Data Sources allow you to index both on-chain and off-chain data in parallel. While traditional methods are used to halt indexing when fetching from IPFS, File Data Sources continue indexing without interruption.
Implementing File Data Sources in Your Subgraph
To illustrate how File Data Sources work, we are going to build a subgraph for Beanz NFT collection whose contract can be viewed here and its IPFS metadata can be viewed here:
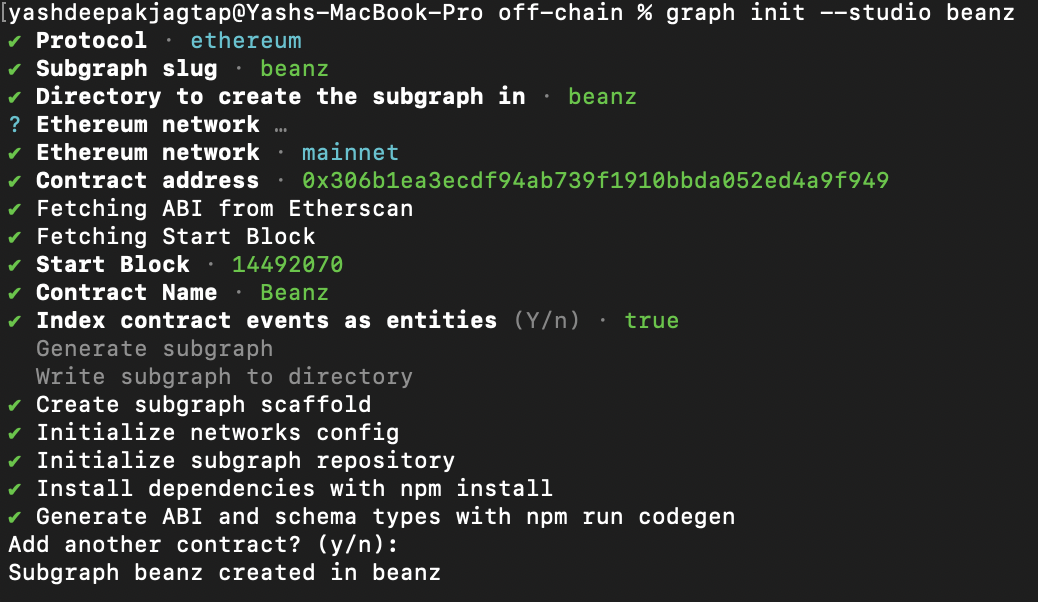
We will create a subgraph through Subgraph Studio. Click on the "Create a subgraph" button, enter a subgraph name (e.g. beanz) and select the blockchain as "Ethereum".
You can install Graph CLI using npm or yarn.
npm install -g @graphprotocol/graph-cli
                 OR
yarn global add @graphprotocol/graph-cli
Initialize your subgraph using the CLI
graph init --studio <yourSubgraphName>
Select
✔ Protocol · ethereum
✔ Subgraph slug · beanz
✔ Directory to create the subgraph in · beanz
? Ethereum network …
✔ Ethereum network · mainnet
✔ Contract address · 0x306b1ea3ecdf94ab739f1910bbda052ed4a9f949
✔ Fetching ABI from Etherscan
✔ Fetching Start Block
✔ Start Block · 14492070
✔ Contract Name · Beanz
✔ Index contract events as entities (Y/n) · true
We will modify the default code provided to us by The Graph into the code which can help us track events for our contract.
Open the subgraph folder in your code editor and replace your subgraph.yaml file with the following configuration.
specVersion: 0.0.5
schema:
    file: ./schema.graphql
dataSources:
    - kind: ethereum
      name: Beanz
      network: mainnet
      source:
          address: "0x306b1ea3ecdf94aB739F1910bbda052Ed4A9f949"
          abi: Beanz
          startBlock: 14492070
      mapping:
          kind: ethereum/events
          apiVersion: 0.0.7
          language: wasm/assemblyscript
          entities:
              - Token
              - Owner
          abis:
              - name: Beanz
                file: ./abis/Beanz.json
          eventHandlers:
              - event: Transfer(indexed address,indexed address,indexed uint256)
                handler: handleTransfer
          file: ./src/beanz.ts
templates:
    - name: TokenMetadata
      kind: file/ipfs
      mapping:
          apiVersion: 0.0.7
          language: wasm/assemblyscript
          file: ./src/beanz.ts
          handler: handleMetadata
          entities:
              - TokenMetadata
          abis:
              - name: Beanz
                file: ./abis/Beanz.json
We have listed only two entities Token and Owner with one event handler handleTransfer which are the on-chain components.
Also, we have listed an entity TokenMetadata under 'templates' for off-chain data and created a handler handleMetadata .
Here you can see we are already keeping the on-chain data separate from the off-chain data. This is crucial for clarity and organization. You can link them when necessary.
Now, let's write the mapping for these entities and handlers. Update your beanz.ts file code with the following code:
// GRAPH CODGEN GENERATES TYPE SAFETY BY REFERENCING SCHEMA.GRAPHQL AND SUBGRAPH.YAML. Its best practice to build subgraph.yaml and schema.graphql prior to arranging your src/mappings.ts file (in this case, mappings.ts was renamed to beanz.ts)

import { Transfer as TransferEvent } from "../generated/Beanz/Beanz";
// `graph codegen` generates types from the events in the Beanz contract. Here, we only import the `Transfer` type as `TransferEvent` instead of all of the events.
import { Token, TokenMetadata, User } from "../generated/schema";
// `graph codegen` generates the Token, TokenMetadata, and User types that are created from our entity definitions in the schema.graphql file.
import { TokenMetadata as TokenMetadataTemplate } from "../generated/templates";
// `graph codegen` generates the TokenMetadata template that is created from our template definition in subgraph.yaml

// IMPORT HELPERS FROM GRAPH-TS TO HANDLE THE METADATA:

import { json, Bytes, dataSource, log } from "@graphprotocol/graph-ts";
// Use `log` for error logging as needed. You can find the logs in your subgraph's Subgraph Studio's dashboard (www.thegraph.com/studio/subgraph/<yoursubgraphname>)

const ipfsHash = "QmdYeDpkVZedk1mkGodjNmF35UNxwafhFLVvsHrWgJoz6A";
// Define ipfshash that will be used as the base of the tokenIpfsHash in the handleTransfer function.

export function handleTransfer(event: TransferEvent): void {
    let token = Token.load(event.params.tokenId.toString());
    // Look in the subgraph's local store to see if the token has already been minted. If it has, load it by passing in its ID (tokenId is this Token's ID). If not, create a new Token entity and populate it with event data VVV

    if (!token) {
        token = new Token(event.params.tokenId.toString());
        // Whoever the token was transferred to is the owner, so assign the 'to' to the token.owner field as well as assign the tokenId to the token.tokenID field.
        token.owner = event.params.to.toHexString();
        token.tokenID = event.params.tokenId;

        // Create the tokenURI for both recordkeeping as well as to create the ipfsHashUri below VVV.
        token.tokenURI = "/beanz_metadata/" + event.params.tokenId.toString();

        // Create the iphsHashUri to trigger the TokenMetadata template that will create the TokenMetadata entity.
        const ipfsHashUri = ipfsHash + token.tokenURI;

        token.ipfsHashURI = ipfsHashUri;

        TokenMetadataTemplate.create(ipfsHashUri);
    }
    token.updatedAtTimestamp = event.block.timestamp;
    token.save();

    // Create a new User entity and pass in the 'to' address as its ID if it doesn't already exist.

    let user = User.load(event.params.to.toHexString());
    if (!user) {
        user = new User(event.params.to.toHexString());
        user.save();

        // Go to schema.graphql where we have linked the User.ID entity and the Token.owner entity through a Reverse Lookup. This is possible as they both have the same "to" address, linking each Token owned by the 'to' address to the User.ID address.
    }
}

// HANDLE METADATA FUNCTION TRIGGERED BY THE TOKENMETADATA TEMPLATE:

export function handleMetadata(content: Bytes): void {
    let tokenMetadata = new TokenMetadata(dataSource.stringParam());
    // Create a new TokenMetadata entity and pass in the dataSource as its ID. This is the ipfsHashUri that we created in the handleTransfer function above.

    const value = json.fromBytes(content).toObject();
    // Create a value variable that will be used to store the json object that is passed in as the content parameter.
    if (value) {
        const image = value.get("image");
        const name = value.get("name");
        const attributes = value.get("attributes");

        // Assemblyscript needs to have nullchecks. If the value exists, then we can proceed with the creating an image, name, and attributes variable gathered from the json object.

        if (name && image && attributes) {
            tokenMetadata.name = name.toString();
            tokenMetadata.image = image.toString();
            const attributesArray = attributes.toArray();

            // Assign the name and image object to the tokenMetadata.name and tokenMetadata.image fields. Then, create an attributesArray variable that will be used to store the attributes object as an array. Converting to an array allows us to first loop through the array with the `switch` statement below, then assign the trait_type and value to the tokenMetadata fields.

            if (attributesArray) {
                for (let i = 0; i < attributesArray.length; i++) {
                    const attributeObject = attributesArray[i].toObject();
                    const trait_type = attributeObject.get("trait_type");
                    const value = attributeObject.get("value");

                    if (trait_type && value) {
                        switch (i) {
                            case 0:
                                tokenMetadata.traitType0 = trait_type.toString();
                                tokenMetadata.value0 = value.toString();
                                break;
                            case 1:
                                tokenMetadata.traitType1 = trait_type.toString();
                                tokenMetadata.value1 = value.toString();
                                break;
                            case 2:
                                tokenMetadata.traitType2 = trait_type.toString();
                                tokenMetadata.value2 = value.toString();
                                break;
                            case 3:
                                tokenMetadata.traitType3 = trait_type.toString();
                                tokenMetadata.value3 = value.toString();
                                break;
                            case 4:
                                tokenMetadata.traitType4 = trait_type.toString();
                                tokenMetadata.value4 = value.toString();
                                break;
                            case 5:
                                tokenMetadata.traitType5 = trait_type.toString();
                                tokenMetadata.value5 = value.toString();
                                break;
                            case 6:
                                tokenMetadata.traitType6 = trait_type.toString();
                                tokenMetadata.value6 = value.toString();
                                break;
                            case 7:
                                tokenMetadata.traitType7 = trait_type.toString();
                                tokenMetadata.value7 = value.toString();
                                break;
                            case 8:
                                tokenMetadata.traitType8 = trait_type.toString();
                                tokenMetadata.value8 = value.toString();
                                break;
                        }
                    }
                }
            }
            tokenMetadata.save();
        }
    }
}
The provided code is a TypeScript script used to define the behaviour of a subgraph. Let's break down its key components and functions:
Imports: The code begins with a series of import statements. These imports include various modules and types that are essential for building the subgraph.
TransferEventis imported from the "Beanz" contract, representing the "Transfer" event.Token,TokenMetadata, andUserare imported from the generated schema and represent the data entities created based on the schema definition which we will see ahead.TokenMetadataTemplateis imported from generated templates, particularly the "TokenMetadata" template.Other imports include necessary modules like
json,Bytes,dataSource, andlogfor data handling and logging.
ipfsHash: A constant variable,
ipfsHashis defined with a specific IPFS hash. This hash serves as the base for thetokenIpfsHashused in thehandleTransferfunction. It is a reference to an IPFS resource.const ipfsHash = "QmdYeDpkVZedk1mkGodjNmF35UNxwafhFLVvsHrWgJoz6A";handleTransfer Function: The
handleTransferfunction is responsible for processing Ethereum events, particularly the "Transfer" event from the "Beanz" contract.export function handleTransfer(event: TransferEvent): void { let token = Token.load(event.params.tokenId.toString()); // Look in the subgraph's local store to see if the token has already been minted. If it has, load it by passing in its ID (tokenId is this Token's ID). If not, create a new Token entity and populate it with event data VVV if (!token) { token = new Token(event.params.tokenId.toString()); // Whoever the token was transferred to is the owner, so assign the 'to' to the token.owner field as well as assign the tokenId to the token.tokenID field. token.owner = event.params.to.toHexString(); token.tokenID = event.params.tokenId; // Create the tokenURI for both recordkeeping as well as to create the ipfsHashUri below VVV. token.tokenURI = "/beanz_metadata/" + event.params.tokenId.toString(); // Create the iphsHashUri to trigger the TokenMetadata template that will create the TokenMetadata entity. const ipfsHashUri = ipfsHash + token.tokenURI; token.ipfsHashURI = ipfsHashUri; TokenMetadataTemplate.create(ipfsHashUri); } token.updatedAtTimestamp = event.block.timestamp; token.save(); }This function performs the following actions:
It attempts to load a
Tokenentity based on thetokenIdassociated with the event. If the entity does not exist, a newTokenentity is created.A
tokenURIis constructed, and anipfsHashUriis created by concatenating theipfsHashand thetokenURI.The
TokenMetadataTemplateis used to create a new template entity with theipfsHashUri.After handling the event, the code updates the
Tokenentity with the latest timestamp and saves the changes.
User Entity Creation: We have created reverse lookups to see which users own which tokens.
let user = User.load(event.params.to.toHexString());
    if (!user) {
        user = new User(event.params.to.toHexString());
        user.save();
    }
handleMetadata Function: The
handleMetadatafunction is triggered by theTokenMetadataTemplate. It processes the content passed to it as aBytesparameter, which typically contains JSON data.export function handleMetadata(content: Bytes): void { let tokenMetadata = new TokenMetadata(dataSource.stringParam()); // Create a new TokenMetadata entity and pass in the dataSource as its ID. This is the ipfsHashUri that we created in the handleTransfer function above. const value = json.fromBytes(content).toObject(); // Create a value variable that will be used to store the json object that is passed in as the content parameter. if (value) { const image = value.get("image"); const name = value.get("name"); const attributes = value.get("attributes"); // Assemblyscript needs to have nullchecks. If the value exists, then we can proceed with the creating an image, name, and attributes variable gathered from the json object. if (name && image && attributes) { tokenMetadata.name = name.toString(); tokenMetadata.image = image.toString(); const attributesArray = attributes.toArray(); // Assign the name and image object to the tokenMetadata.name and tokenMetadata.image fields. Then, create an attributesArray variable that will be used to store the attributes object as an array. Converting to an array allows us to first loop through the array with the `switch` statement below, then assign the trait_type and value to the tokenMetadata fields. if (attributesArray) { for (let i = 0; i < attributesArray.length; i++) { const attributeObject = attributesArray[i].toObject(); const trait_type = attributeObject.get("trait_type"); const value = attributeObject.get("value"); if (trait_type && value) { switch (i) { case 0: tokenMetadata.traitType0 = trait_type.toString(); tokenMetadata.value0 = value.toString(); break; case 1: tokenMetadata.traitType1 = trait_type.toString(); tokenMetadata.value1 = value.toString(); break; case 2: tokenMetadata.traitType2 = trait_type.toString(); tokenMetadata.value2 = value.toString(); break; case 3: tokenMetadata.traitType3 = trait_type.toString(); tokenMetadata.value3 = value.toString(); break; case 4: tokenMetadata.traitType4 = trait_type.toString(); tokenMetadata.value4 = value.toString(); break; case 5: tokenMetadata.traitType5 = trait_type.toString(); tokenMetadata.value5 = value.toString(); break; case 6: tokenMetadata.traitType6 = trait_type.toString(); tokenMetadata.value6 = value.toString(); break; case 7: tokenMetadata.traitType7 = trait_type.toString(); tokenMetadata.value7 = value.toString(); break; case 8: tokenMetadata.traitType8 = trait_type.toString(); tokenMetadata.value8 = value.toString(); break; } } } } tokenMetadata.save(); } } }A new
TokenMetadataentity is created, and its ID is based on thedataSource.stringParam(), which represents the IPFS hash URI.The
contentparameter is converted into a JSON object.If the JSON object exists, the function extracts properties such as "image", "name", and "attributes" from it.
The extracted data is assigned to the
TokenMetadataentity's fields, and if applicable, to trait-specific fields.
Okay now it's time to create some Entities.
Entities are objects which define the structure for how your data will be stored on The Graph's nodes. If you want to read more about them, click on this link.
We will need an Entity which can cover all the variables we have in our events so that we can keep track of all of them. Open up for schema.graphql file and replace the already existing lines of code with the following lines of code:
type Token @entity {
    id: ID!
    owner: User!
    tokenID: BigInt!
    tokenURI: String!
    ipfsHashURI: TokenMetadata
    updatedAtTimestamp: BigInt
}

type TokenMetadata @entity {
    id: ID!
    image: String!
    name: String!
    traitType0: String!
    value0: String!
    traitType1: String!
    value1: String!
    traitType2: String
    value2: String
    traitType3: String
    value3: String
    traitType4: String
    value4: String
    traitType5: String
    value5: String
    traitType6: String
    value6: String
    traitType7: String
    value7: String
    traitType8: String
    value8: String
}

type User @entity {
    id: ID!
    tokens: [Token!]! @derivedFrom(field: "owner")
}
id: ID!: Every entity has a unique identifier, and this field is of the ID type. It's essential for referencing and querying individual tokens.owner: User!: This field establishes a relationship between aTokenand its owner, aUserentity. The exclamation mark (!) indicates that this field is required and cannot be null.tokenID: BigInt!: ThetokenIDfield stores a large integer value, which is often used to uniquely identify the token.tokenURI: String!: ThetokenURIfield is a string that typically contains a URI pointing to the token's metadata. This metadata can include information about the token's properties, images, and more.ipfsHashURI: TokenMetadata: This field establishes a connection to aTokenMetadataentity. It allows you to associate a token with its metadata, which can be stored off-chain using IPFS.updatedAtTimestamp: BigInt: This field stores a large integer representing the timestamp of the most recent update to the token. It's useful for tracking when a token's data was last modified.TokenMetadatais an entity that represents the metadata associated with aToken. This entity is used to store detailed information about a token's attributes. Let's understand the fields:id: ID!: As with any entity,TokenMetadatahas a unique identifier.image: String!: This field stores a URL or reference to an image associated with the token. It's often used to display the visual representation of the token.name: String!: Thenamefield holds the name or title of the token, providing a human-readable label.traitTypeXandvalueX: These fields are a set of key-value pairs used to describe the token's attributes. They are structured to accommodate up to nine pairs (from 0 to 8).
tokens: [Token!]!: This field is marked as derived using@derivedFrom, which means that it doesn't need to be explicitly set. It's automatically generated based on the relationship between a user and the tokens they own. Users can be associated with multiple tokens, and this field provides a list of those tokens.
If you want to learn more about the types you can visit this link.
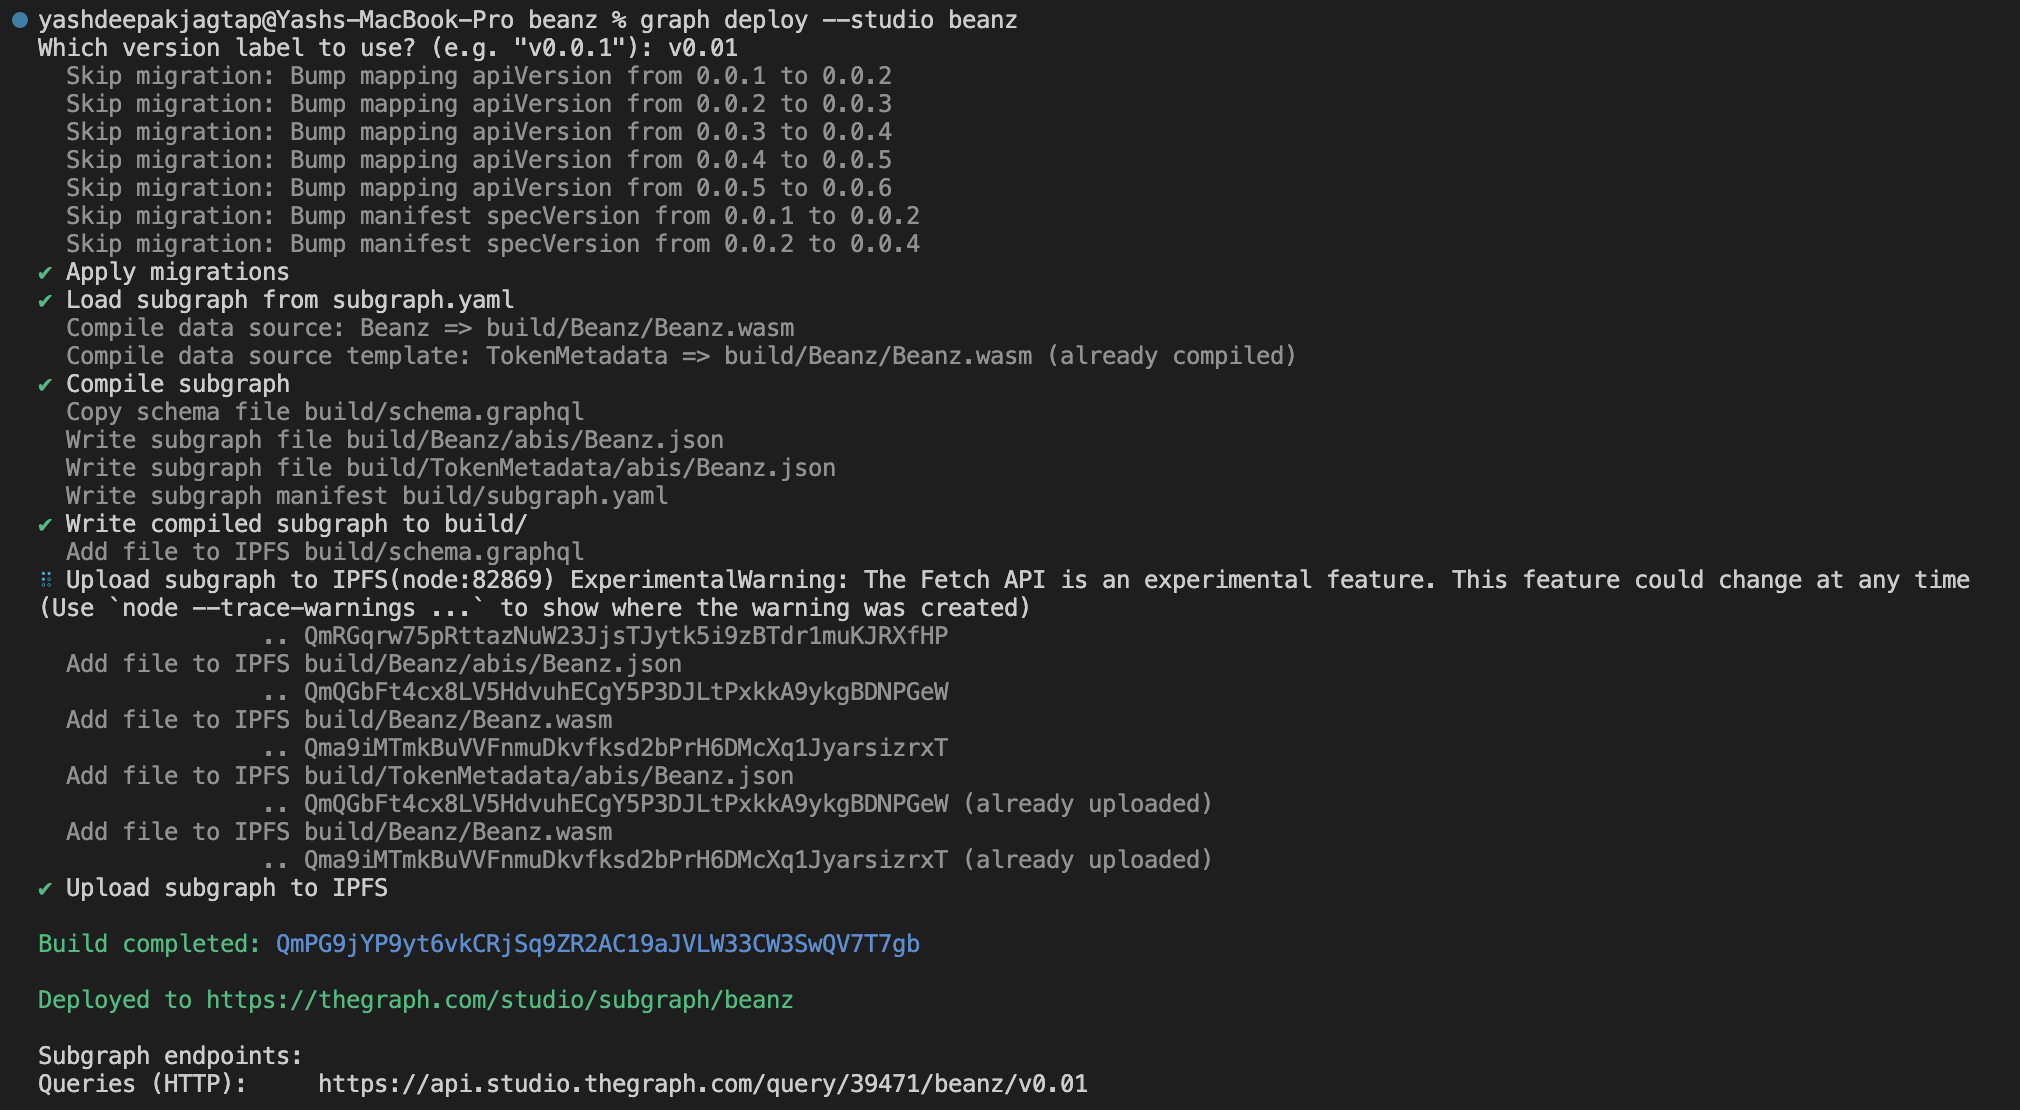
Now comes the final part. We will authenticate within the CLI, build and deploy your subgraph to the Studio.
AUTHENTICATE IN CLI
graph auth --studio <deployKey>
ENTER SUBGRAPH
cd beanz
BUILD SUBGRAPH
graph codegen && graph build
DEPLOY SUBGRAPH
graph deploy --studio beanz
You will be able to see your graph because it's deployed now 🚀 👀
Go to the "Playground" to play around with the data and see it all in action. Let's see how it looks.
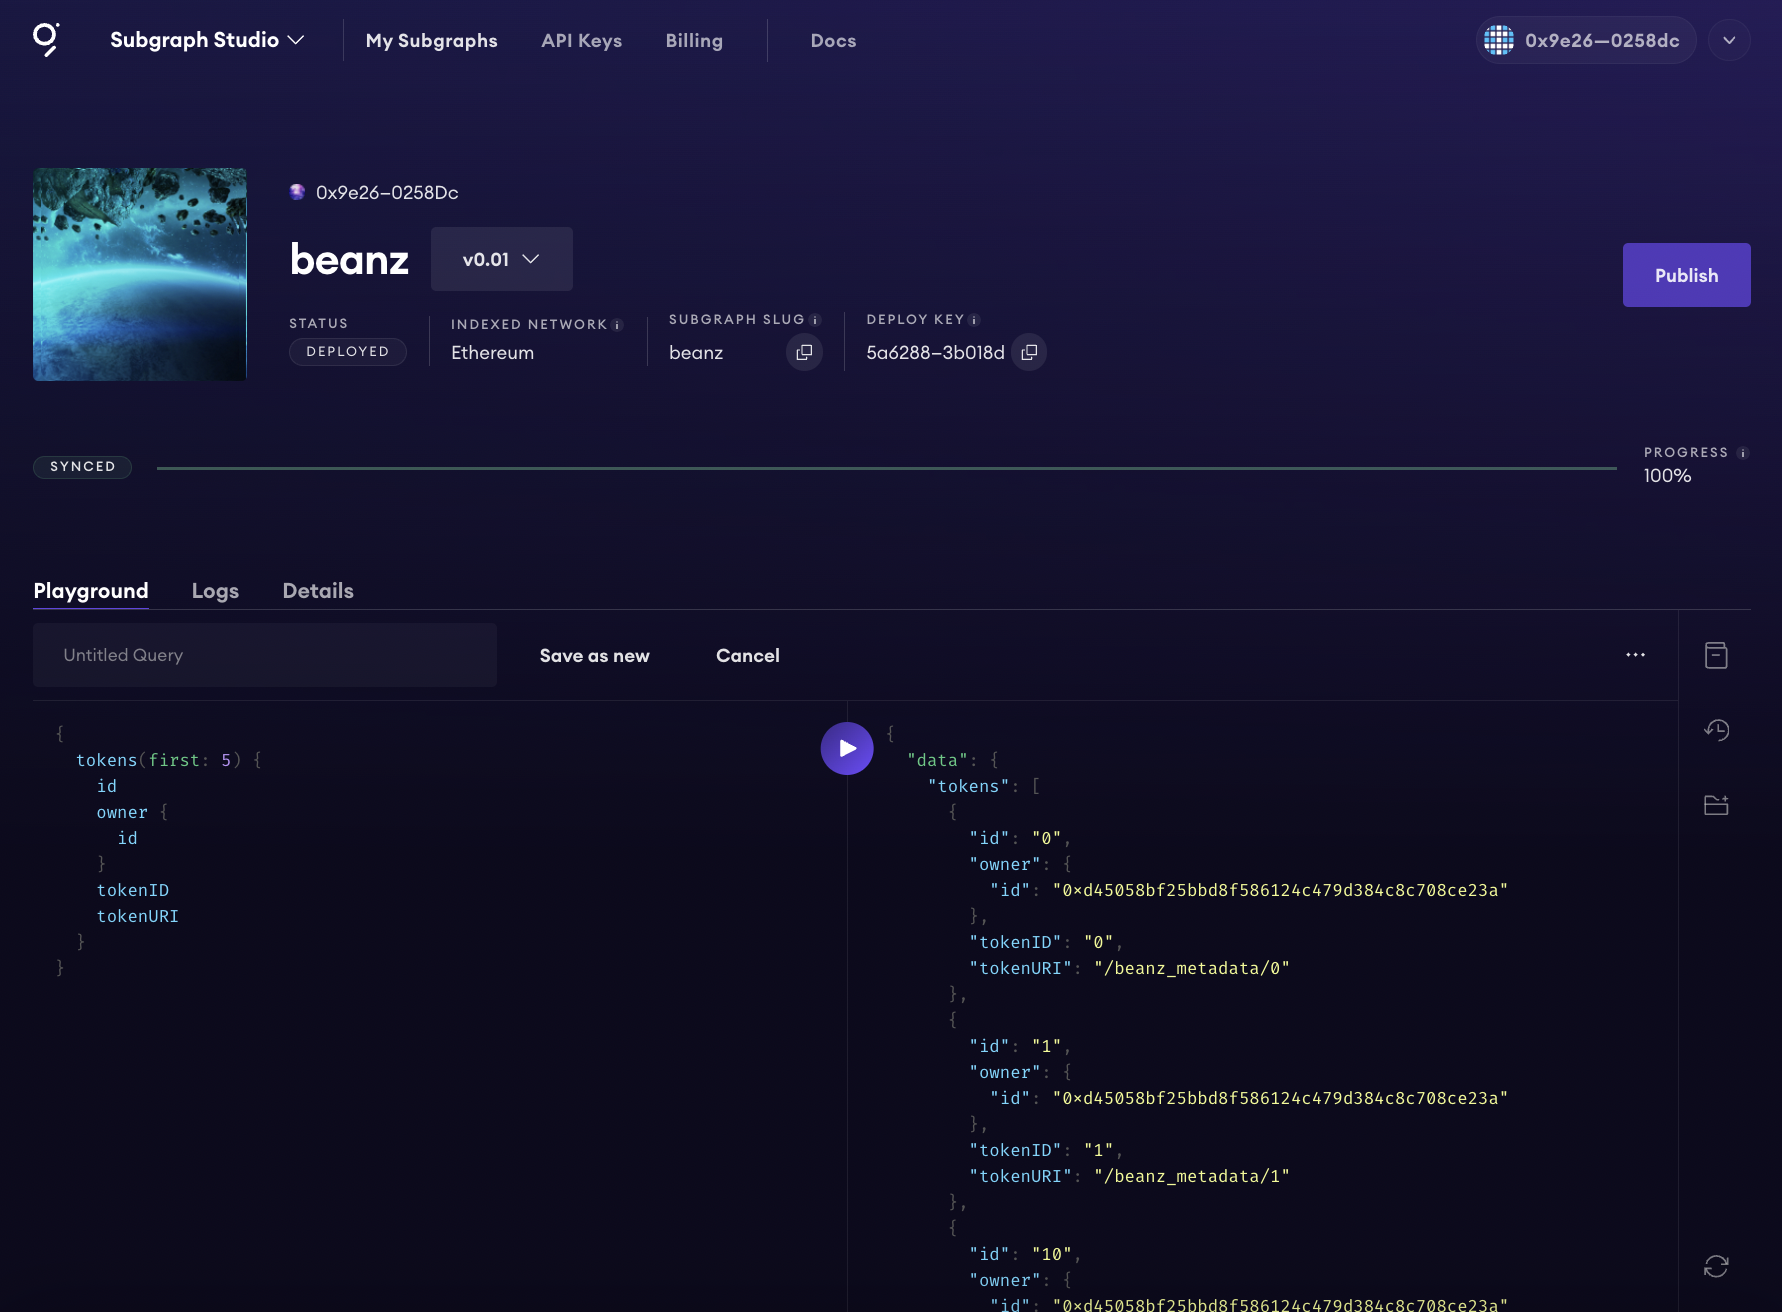
CONGRATULATIONSSS! YOU DID IT 🚀🥇
High-Level Review of File Data Sources
Know your event and know your IPFS metadata
On-chain events trigger IPFS file search in parallel
It can take 20 - 30 minutes for the NFT metadata to be gathered for initial deploy
Advanced Features
File Data Sources enable advanced features like full-text searching, which allows you to search your data using any plain text you desire, greatly enhancing the query capabilities of your subgraph. Check it out here.
Reference -
Thank you for joining me in this journey through File Data Sources, and look forward to seeing how you leverage this powerful tool in your projects!
Happy Learning!
Connect with me here -
Twitter - https://twitter.com/0x_yasshhh_
LinkedIn - https://www.linkedin.com/in/yash-jagtap-46384610a/
GitHub - https://github.com/yash251


